 @ 2012-08-26 5:23 AM (#8363 - in reply to #8341) (#8363) Top
Posts: 199


Country : United States
motris posted @ 2012-08-26 5:23 AM
I've taken some photos along the route to a Gapped Kakuro solution and those will be posted here shortly.
So I only really did the right side very logically during the test. The start is on an intersecting big/small clue, which gives a 12 and 13 pair that work like an X-Wing to eliminate options above it (no 1 can be in either of the 3 clues, which tells you where those sit, for example). This is similar to what my test paper looked like before I moved off this path. One other big observation is that the top row can only have 6 clues and exactly fits just one way with spaces.
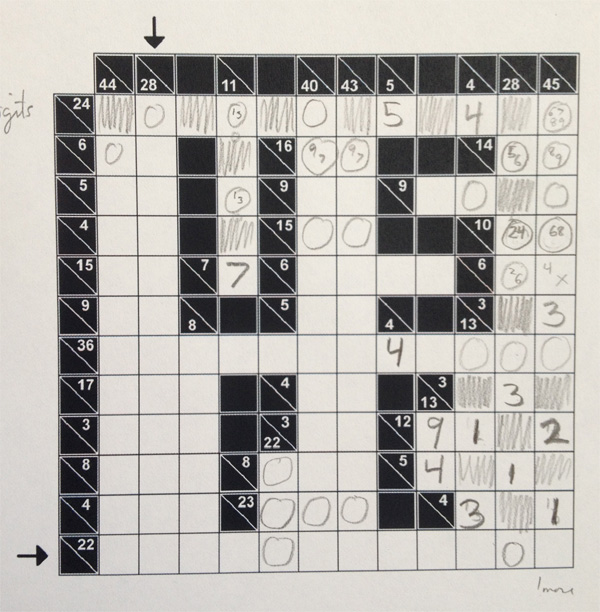
That top row though actually gives the next step. With a 5 and 4, and 15 remaining, there actually is just one distribution of digits that works (1239) so you can place a 9 in the upper-right corner and get a lot from that. I've marked the "potential uniqueness" spot MellowMelon and thedan talked about. The clue with the 6 on the other side of the S can be approached the same way but I ignore uniqueness for now.
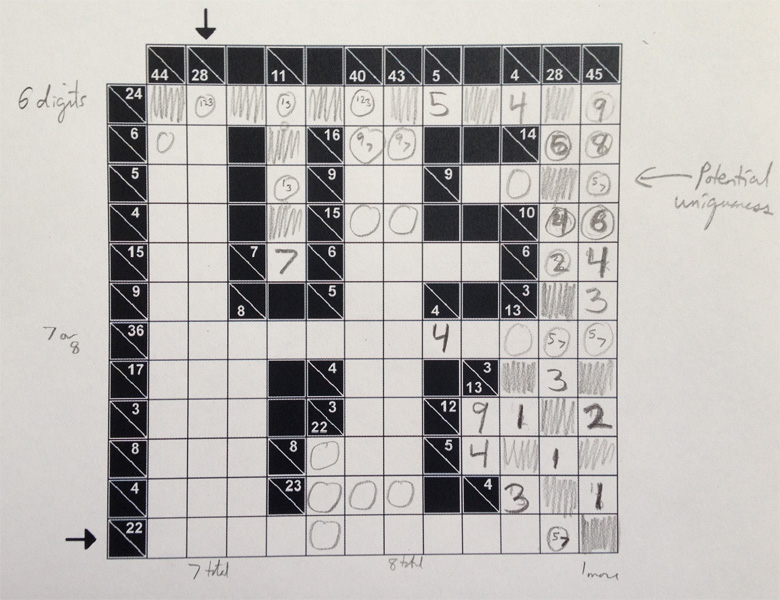
Just like the top row, the bottom row can only have 6 numbers. With the spacing as is you can see the vertical 13 must be just 3 clues with a 9 up top. With a 9 in the long 36 row, you can now have only as many as 7 digits. And this also has just one spacing. I've marked those circles and blanks. Notice also that the only place for a 9 in the 22 going down is the second to last row. If you focus here longer you can get a break-in to the middle but I moved to the left first.
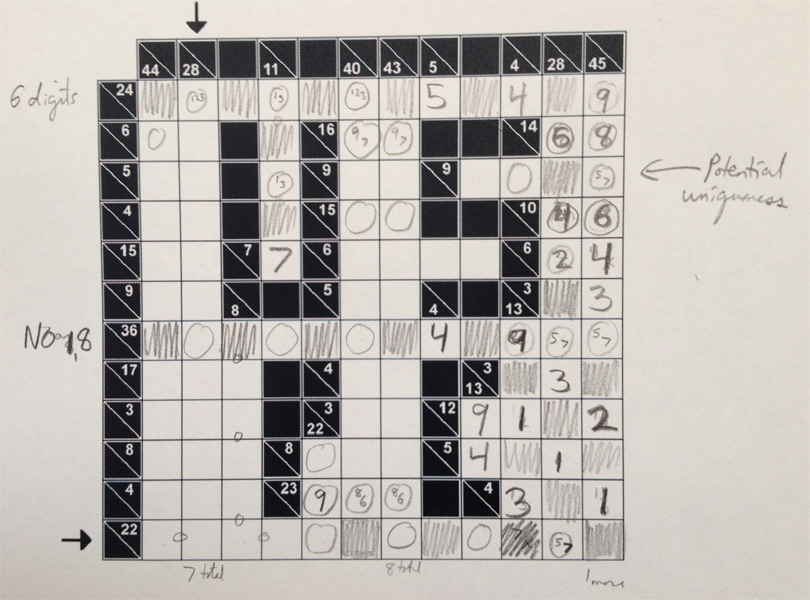
To break into the left column you need to work off the forced double clues and mark what you can. One critical observation is that the 17 cannot be just 2 clues. The 8 can give at most 5, leaving 12, and the second column can give at most a 7, leaving 10. Marking all those circles in leaves little space in column 2 which forces a lot of spaces.
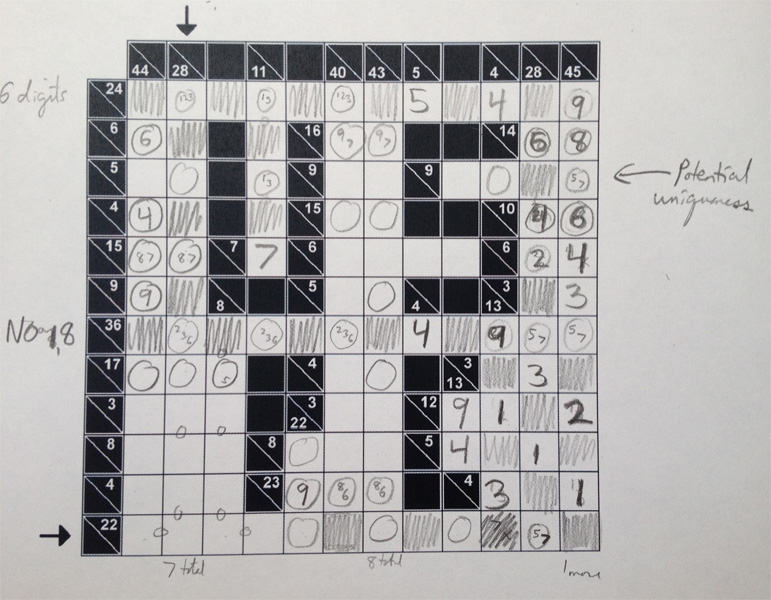
And since 28 in 7 clues cannot have an 8, you can do a lot of solving in that space too. Notice that once the 986 are spent in the first column, to get to 17 you need at least a 7 there, which forces 764 going across. This isn't "trivial", but is basically about grabbing maximums.
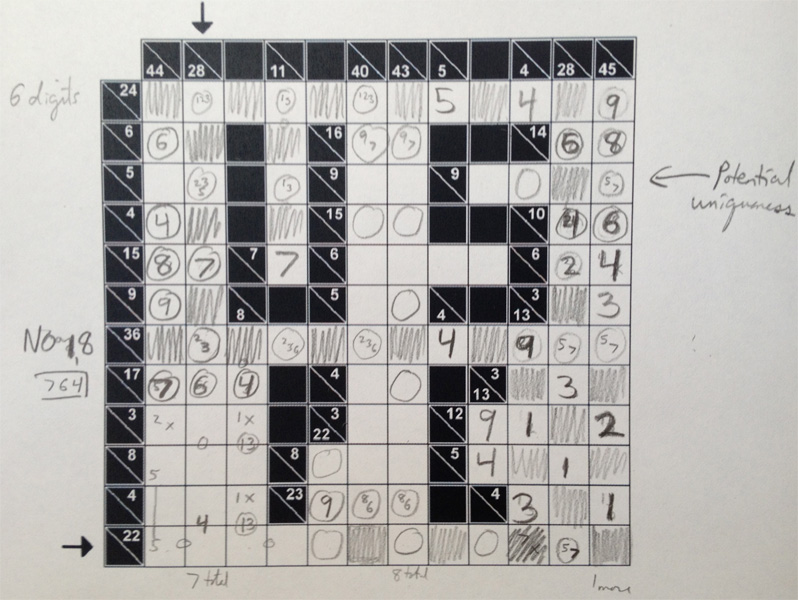
The last thing to observe, which you can get much much sooner than I did, and certainly assisted by using uniqueness to deal with the 5/7's, is that 22 in the bottom middle. With the 9 placed, the remaining digits are from 5678. In the bottom row you can only use 5 or 7. But 5 makes the top 8 with two touching blanks. So the bottom is a 7, the other a 6. This pushes a 2 into the middle but only one column (the 40 not the 43) can take it. The rest flows from these. Well, maybe the lower-left has a little bite left in it, but I hope you can finish it out.
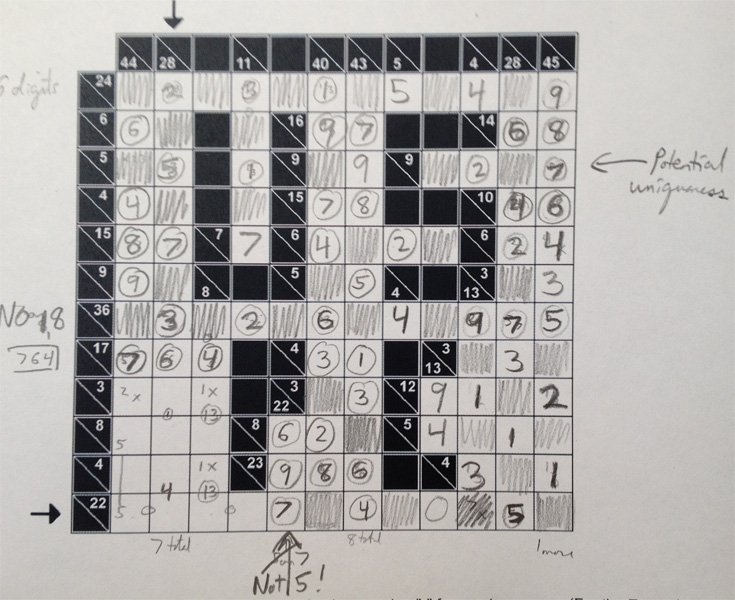
*Apologies for forgetting this site has a "disable HTML" button to unclick. Also, I think my "no 1,8" note that appears is not true at the instant I write it but doesn't affect the solving really. Just don't dwell on it at the moment you first see it.
Edited by motris 2012-08-26 6:59 AM
So I only really did the right side very logically during the test. The start is on an intersecting big/small clue, which gives a 12 and 13 pair that work like an X-Wing to eliminate options above it (no 1 can be in either of the 3 clues, which tells you where those sit, for example). This is similar to what my test paper looked like before I moved off this path. One other big observation is that the top row can only have 6 clues and exactly fits just one way with spaces.

That top row though actually gives the next step. With a 5 and 4, and 15 remaining, there actually is just one distribution of digits that works (1239) so you can place a 9 in the upper-right corner and get a lot from that. I've marked the "potential uniqueness" spot MellowMelon and thedan talked about. The clue with the 6 on the other side of the S can be approached the same way but I ignore uniqueness for now.

Just like the top row, the bottom row can only have 6 numbers. With the spacing as is you can see the vertical 13 must be just 3 clues with a 9 up top. With a 9 in the long 36 row, you can now have only as many as 7 digits. And this also has just one spacing. I've marked those circles and blanks. Notice also that the only place for a 9 in the 22 going down is the second to last row. If you focus here longer you can get a break-in to the middle but I moved to the left first.

To break into the left column you need to work off the forced double clues and mark what you can. One critical observation is that the 17 cannot be just 2 clues. The 8 can give at most 5, leaving 12, and the second column can give at most a 7, leaving 10. Marking all those circles in leaves little space in column 2 which forces a lot of spaces.

And since 28 in 7 clues cannot have an 8, you can do a lot of solving in that space too. Notice that once the 986 are spent in the first column, to get to 17 you need at least a 7 there, which forces 764 going across. This isn't "trivial", but is basically about grabbing maximums.

The last thing to observe, which you can get much much sooner than I did, and certainly assisted by using uniqueness to deal with the 5/7's, is that 22 in the bottom middle. With the 9 placed, the remaining digits are from 5678. In the bottom row you can only use 5 or 7. But 5 makes the top 8 with two touching blanks. So the bottom is a 7, the other a 6. This pushes a 2 into the middle but only one column (the 40 not the 43) can take it. The rest flows from these. Well, maybe the lower-left has a little bite left in it, but I hope you can finish it out.

*Apologies for forgetting this site has a "disable HTML" button to unclick. Also, I think my "no 1,8" note that appears is not true at the instant I write it but doesn't affect the solving really. Just don't dwell on it at the moment you first see it.
Edited by motris 2012-08-26 6:59 AM
 @ 2012-08-26 7:48 AM (#8369 - in reply to #8341) (#8369) Top
Posts: 4
Country : United States
Aerion posted @ 2012-08-26 7:48 AM
Any suggestions how to get started on the Tapa? I just have a few squares marked in the top-left, and am having trouble getting much more. Tapa is a weak point of mine, for whatever reason ... not that there's any shortage of practice materials!
 @ 2012-08-26 8:32 AM (#8370 - in reply to #8341) (#8370) Top
Posts: 25

Country : United States
SKnight posted @ 2012-08-26 8:32 AM
The top left is definitely a good start -- you should have the "1 1" marked as both in the second row, and all 4 corners of the "3 3" filled in, pretty easily.
If you want to continue near the top, the combination of the 4, 6, and "2 2" all near the top actually tells you quite a bit:
At least one square on the left-hand side of the 4 must be filled in, since if not, the only configuration for the "2 2" would isolate the top bit of the "2 2".
But also at least one square in the bottom row of the 4 must be filled in, since there are only 2 missing squares in the 6.
Put together, this means that the entire row of 3 at the bottom of that 4 must be filled in, and the row at the top of the 4 must be empty.
The only location for the other half of the "2 2" is the NW and W squares of the "2 2", which in turn forces your "3 3" to be two vertical lines.
That tells us a lot about the "2 3" next to it -- the W square of the "2 3" must be empty, and your two portions must start at the north square (heading clockwise)
and the SW square (heading ccw). Because the gap in the 6 must be 2 squares, we know the SE corner is the empty one, with the gap in the 6 continuing
one more square to the east.
Filling in the rest of the 6, we realize we have filled in a "3" in our "2 3" on the top right, and the "2" must head vertically down the right and exit downwards.
Turning to the 6 near the center of the puzzle, the three filled in cells above it mean the N square of that 6 is empty, and one of the squares next to it will
be the other empty cell. Fill in the 5 in a U-shape at the bottom of the 6.
Let's look at the little segment of wall over on the top left. It's going to have to connect to everything else somehow. The only way it can do that is
by cutting over to the right somewhere towards the center of the puzzle. If it goes down the left side, there's no escape from the bottom left
corner. Also, if the cell above the "2 3" (r7c2) were shaded, the "2" part of the "2 3" would not be able to escape the bottom left corner.
So r7c2 is blank, and r6 c2 and c3 are filled in to connect up the left hand side. This means r6c5 is the other empty cell of the 6.
Now we know how the "1 4" at r7c6 must work out, so complete the "4" along the bottom and fill in the "1" in the NE corner continuing east.
Looking at the "1 4" at r9c6, the "1" cant be in the S square obviously, but also can't be in the SW square (where would it go?), so the
"1" is the SE square, and the "4" must finish in the W square. Similarly, the "1" for the "1 4" at r9c4 must be in the SW square and
loop around to the left along the outside edge of the puzzle to connect up with the rest of the wall (also finishing that "2 3" in the process)
That shaded cell in r10c7 must continue around the "3" (completing that) and then to r8c8 to connect up the left hand side of the puzzle.
That forces the "5" and we're done.
 @ 2012-08-26 8:41 AM (#8371 - in reply to #8341) (#8371) Top
Country : United States
MellowMelon posted @ 2012-08-26 8:41 AM
EDIT: blarg ninja'd
Here's a guide to the Tapa; this is almost exactly how I went through it during the test, although I've found a few other ways one might go about it. I'm just going to link to the images since there's a bunch and I don't want the post to explode.
Initial state
Not much to do that's obvious. There's a bit to get from the 3 in the bottom right and the 1,1 in the top left. You'll notice in the image below that I've drawn in some walls near that clue. This is a mark I often make between two cells when I know both cells can't be shaded, as a way of seeing things like connectivity or when a large clue number is particularly restricted. For instance, it makes it clear here that if R3C3/R5C1 is the pair of cells around the 3,3 that's unshaded, we've got issues, so we can shade those in (shown below also).
Progress 1
Okay, so we're going to need to do something nontrivial to crack this. The clue numbers are mostly pretty high so there's not going to be much macro connectivity steps. That pretty much leaves the tightly packed clues as the best place to look, either the block in the top middle or the block in the bottom middle. It's hard to put into words exactly why I would not go for the one on the bottom. But basically 6s and 1,4s are both pretty flexible clues. The top has more restrictions to work with. So let's look up there.
Specifically, I want to focus on the 4. First, it's a single block clue that's not too large. Second, it touches the 2,2 clue in a way that restricts what the 4 can do (not all three cells in the left can be shaded). Third, it touches the 6, which means not all three cells on the bottom can be unshaded. Is there a cell which, if shaded, would have to run all the way down the left edge to touch the 6? Yes: if R1C6 were shaded, there's no way to satisfy both the 2,2 and 6. So it can't be shaded, and we can mark that.
Progress 2
The walls I've drawn near the 1,1 make it clear that issues will be caused if R1C5 is shaded. Now that we have two consecutive unshaded cells on the 2,2, we can apply a pattern to get two shaded cells around that clue: R2C4 and R3C6. It's also clear that R1C3 is not going to be able to escape, so we can find the two shaded cells near the 1,1. The top left falls out fairly quickly from here. Finally, near the 4 we can use our shaded cell on R3C6 to get more around there.
Progress 3
The unshaded cell on R3C4 near the 2,3 gives us a pattern allowing us to shade R5C4, which then gives us another unshaded cell nearby. Finishing the 2,3 and the 6 is pretty quick now.
Progress 4
Notice if R6C4 is shaded, that block is immediately isolated. This is a common idea to watch out for when you've got a line of cells at this distance from a large clue number. So we can shade that one in, which implies a bunch of shaded cells around that 6. That also allows me to mark some connectivity barriers around the 1,4 below.
Progress 5
If R6C5 is shaded, I can draw those same connectivity barriers around the 1,4 to the right, completely separating the left and right halves. That's no good, so it's R6C3 shaded instead. There's only one way for the left and right to connect now, and we can finish the top right 1,4.
Progress 6
Now you can figure out easily where the 1-cell block of the bottom right 1,4 clue is, and everything else will fall into place almost immediately.
Solution
Edited by MellowMelon 2012-08-26 8:41 AM
 @ 2012-08-26 9:22 AM (#8373 - in reply to #8341) (#8373) Top
Posts: 199


Country : United States
motris posted @ 2012-08-26 9:22 AM
Which came first? Tapa Borders, or your border marking technique? I haven't thought to draw in walls like you did but they are extremely powerful in seeing all the connectivity issues. I'll have to try to play with them in the new Tapa book I just got.
 @ 2012-08-26 9:45 AM (#8374 - in reply to #8373) (#8374) Top
Country : United States
MellowMelon posted @ 2012-08-26 9:45 AM
The border marking technique is something I've been using for a long time, much earlier than when I first made Tapa Borders. Though for the purpose of making that image I did reuse the same drawing code.
Of course it's not quite the same as the Borders wall, since that one specifies exactly one black cell and this one just says not both.
Of course it's not quite the same as the Borders wall, since that one specifies exactly one black cell and this one just says not both.
 @ 2012-08-26 9:49 AM (#8375 - in reply to #8341) (#8375) Top
Posts: 4
Country : United States
Aerion posted @ 2012-08-26 9:49 AM
Hm, I usually use an X on the border to indicate exactly one of the two cells (same as I do for Star Battle), but it's not terribly visible. I'll have to try bolding the border.
Thanks for the guides -- getting the push at R1C6 was just what I needed.
Thanks for the guides -- getting the push at R1C6 was just what I needed.
 @ 2012-08-27 3:09 AM (#8406 - in reply to #8341) (#8406) Top
Posts: 148


Country : France
Ours brun posted @ 2012-08-27 3:09 AM
The classic sudoku wasn't indeed just another classic sudoku. It had a very pretty move to see - the one Thomas missed and also, certainly, the one that explains the troubles encountered by the test-solvers since it is really "the one step" that gives the puzzle its difficulty and value.
You should reach this point without too much trouble - give or take the 6 in R7C4, that is not that easy to spot but it isn't needed in what follows anyway.

Here, you just have to focus on the 9s. Thomas, you were on the right track by targeting them - just, you did not need coloring.
First, note that in region 4, they have to be in row 5 or 6 ; and same in region 6. Therefore, in region 5, they are in either column 4 or 5.
In region 2, 9 also has to be in one of those two columns. And here we are (already) : the only valid cell for a 9 in region 8 is R9C6.

It really wasn't that hard, but as is always the case on such puzzles with an extremely narrow path, you cannot afford to miss a single step. Anyway, the puzzle was a pretty little one, so much more pleasant to solve than the average computer-generated one.
You should reach this point without too much trouble - give or take the 6 in R7C4, that is not that easy to spot but it isn't needed in what follows anyway.

Here, you just have to focus on the 9s. Thomas, you were on the right track by targeting them - just, you did not need coloring.
First, note that in region 4, they have to be in row 5 or 6 ; and same in region 6. Therefore, in region 5, they are in either column 4 or 5.
In region 2, 9 also has to be in one of those two columns. And here we are (already) : the only valid cell for a 9 in region 8 is R9C6.

It really wasn't that hard, but as is always the case on such puzzles with an extremely narrow path, you cannot afford to miss a single step. Anyway, the puzzle was a pretty little one, so much more pleasant to solve than the average computer-generated one.
 @ 2012-08-27 3:49 AM (#8407 - in reply to #8406) (#8407) Top
Posts: 199


Country : United States
motris posted @ 2012-08-27 3:49 AM
That's a really nice demonstration on the sudoku's sticking point. I caught the same simple step when I solved it after the test. Often my eye catches the right digit to search, but not the simplest way to find use it (fastest, but not simplest). Here I failed to have the existing note in column 9 about a 9 in box 6, but reconstructed what I needed from just considering the effect of a 9 in R9C7 (which is bad!).
 @ 2012-08-27 6:20 AM (#8409 - in reply to #8363) (#8409) Top
Posts: 18
Country : United States
onigame posted @ 2012-08-27 6:20 AM
My approach on the Gapped Kakuro was actually center before left, which meant I didn't have the benefit of knowing the 6 in the middle row.
What I noticed is that the columns of 40 and 43 mean that you need two 9s and two 7s in those columns. The 16 accounts for one of each, and the 15 accounts for at most one of the other. So where's the fourth? It turns out you can eliminate it from all the rows except for the 2-cell 9 clue -- and putting the 7 there leads to a contradiction.
What I noticed is that the columns of 40 and 43 mean that you need two 9s and two 7s in those columns. The 16 accounts for one of each, and the 15 accounts for at most one of the other. So where's the fourth? It turns out you can eliminate it from all the rows except for the 2-cell 9 clue -- and putting the 7 there leads to a contradiction.